Harry Potter Birthday Party! PART 1- Decorations
Hello world! 🌍
Wow! This blog has been a long time coming, for the very reason of this particular post. I have been organising and making a Harry Potter birthday party! It took me two weeks so I have a feeling this post may have to be split into several.
To start with, I want to show you the overall outcome. Unfortunately, I am not quite used to my camera yet and the photos I took are blurry because I was trying to capture the atmosphere which didn't work with the flash and without the flash, they seemed to be blurry. All my guests to the party agreed with me that the photos didn't do it justice. Anyway, here it is:


So, there is the overall look but if we look closer at the decorations, I can show you how to make them!
Decorations


 As we are on the subject of letters, I'm going to show you how to make the 'Flying Letters'. These were inspired by 'Harry Potter and The Philosopher's Stone' when the Hogwarts acceptance letters fly through the fireplace.
You can make these by using paper (instead of envelopes-it's cheaper!) and folding it into an envelope shape.
I then wrote the birthday boy's name and address with an 'Owl Post Stamp' (see 'Owl with the Post'). I made 40 of these!👍
To attach this to the ceiling, I painted a long, thin piece of cardboard black/brown to contrast with the ceiling. I then punched holes through it with a pencil, to then thread different lengths of string through it and fasten to the unpainted side with Sellotape. Then, I stuck the letters onto the string at various levels! We displayed it above our fireplace!You can also leave some off the strings to put in the fireplace below.
Delivery Owl
You may have seen an owl on the end of one of the strings in the photo above. This is how to make it:


Stick them back to back so that when you cut round the owl, it will be double sided. Loop at bit of string a the top and secure it. Then add and other piece of string from Hedwig's claws and stick an envelope on the bottom. I added extra decoration to this envelope than the others. You might want to secure this owl to your 'Flying Letters'.


This is what I put up in my hallway so anybody with a ticket to come to the party had to show it before being able to go into the party room (the kitchen🍽!).
There are many versions of this sign on the internet but the one I chose is the one below:


Potter's Potions
No Harry Potter Party would be the same without POTIONS!🍶-Weird emoji- It's meant to be a cup and jug!
I made several and have lasted until about two weeks later (the liquid ones).
Wow! This blog has been a long time coming, for the very reason of this particular post. I have been organising and making a Harry Potter birthday party! It took me two weeks so I have a feeling this post may have to be split into several.
To start with, I want to show you the overall outcome. Unfortunately, I am not quite used to my camera yet and the photos I took are blurry because I was trying to capture the atmosphere which didn't work with the flash and without the flash, they seemed to be blurry. All my guests to the party agreed with me that the photos didn't do it justice. Anyway, here it is:


So, there is the overall look but if we look closer at the decorations, I can show you how to make them!
Decorations
Owl with the Post (Invitations)🦉
I started by not telling the birthday boy anything about the party, keeping it absolutely secret until I needed to invite him to his own party. So, in true Wizarding fashion, I sent him an owl with an acceptance letter to Hogwarts!
The owl was made from a balloon with a face drawn on in Sharpie, as seen below,

This came with a brown A5 envelope stuck to the bottom with Sellotape. The envelope had the receiver's address on it and instead of the classic, 'The cupboard under the stairs' quote, I
described their bedroom. For example,
'Mr X Ample,
The Master Bedroom,
Exampletown,
Examplecity,
ExamplePostCode'
alongside a hand-drawn 'Owl Post' stamp in the corner.
Inside the envelope, comes the acceptance letter and ticket too. I did some editing to a few I saw online and here they are:

I have crossed out the address (top) and the name of the receiver!

Flying Letters
 As we are on the subject of letters, I'm going to show you how to make the 'Flying Letters'. These were inspired by 'Harry Potter and The Philosopher's Stone' when the Hogwarts acceptance letters fly through the fireplace.
You can make these by using paper (instead of envelopes-it's cheaper!) and folding it into an envelope shape.
To attach this to the ceiling, I painted a long, thin piece of cardboard black/brown to contrast with the ceiling. I then punched holes through it with a pencil, to then thread different lengths of string through it and fasten to the unpainted side with Sellotape. Then, I stuck the letters onto the string at various levels! We displayed it above our fireplace!You can also leave some off the strings to put in the fireplace below.
Delivery Owl
You may have seen an owl on the end of one of the strings in the photo above. This is how to make it:

Stick them back to back so that when you cut round the owl, it will be double sided. Loop at bit of string a the top and secure it. Then add and other piece of string from Hedwig's claws and stick an envelope on the bottom. I added extra decoration to this envelope than the others. You might want to secure this owl to your 'Flying Letters'.
Sign Post


- Platform 9 3/4
- Hagrid's Hut
- Honeydukes
- Privet Drive🏠
- Main Hall
- Diagonally
- Headmaster's Office
- The Burrow
- Gringott's Bank
- Hogwarts
This is what I put up in my hallway so anybody with a ticket to come to the party had to show it before being able to go into the party room (the kitchen🍽!).
There are many versions of this sign on the internet but the one I chose is the one below:

I stuck this to a piece of string with Sellotape and secured it across the hallway.
Happy Birthday Banner

Obviously, you can change what this says, for instance, instead of Happy Birthday, you could put-
- Harry Potter
- Merry Christmas🎅
- Someone's name
- Happy Halloween etc.
Here's how you make it:
Draw the letters needed on a quarter of an A4 piece of paper. I used this font that I found online:

If you then cut out your letters, you can paint them black, avoiding where the holes are in the letters and leave to dry. When they are dry, they may have curled up, so, put them under a large book or something along those lines for a while, until they're flattened.
Cut the string to the right length and secure your letters onto it with Sellotape.
Floating Keys
If you are a serious Potter fan, like me and many other people, you may be aware that in 'Harry Potter and the Philosopher's Stone' Harry, Ron and Hermione enter a room full of floating keys and have to find the one that will let them through the door. I have recreated this iconic moment and turned it into a decoration.

You can start by taking a small bit of card (the sort that amazon boxes are made out of) and painting it black. Then, punch holes through it and add a string loop to each corner.
When the paint is drying, you can cut out key shapes from black card and wing shapes from yellow. One by one, cut a piece of string long enough and pass through the hole with a needle. Sellotape it to the unpainted side. Use the other end of the thread to attach it to the middle of the key and stick the wings around this.
WARNING👿! The thread can get very tangled so if you can, wind each one around some card and secure with a paperclip until you want to put your creation on display.
Potter-Print-Offs
These decorations are simple yet effective. All you need to do is print the pictures off below, A4 size (apart from the 'Lumos' and 'Nox' signs which need to be the width of your light switch).
Here are the images:
----------------------------------------------------------------------------------


You can print them, then cut them out and put them in places around your party. For instance:
Dementors and Ghosts👻
To be fair, my dementors and ghosts were rubbish because my tissue paper was too small. I bet you can make better ones if so, tell me what you did in the comments and how to make them!
Here is mine:

I got balloons and stuck some thread to them, then made a hole in the middle of the tissue paper and threaded it on. I then hung it from the ceiling by the thread. I made a black one too for a dementor but I haven't got a picture.
The Chamber Of Secrets Words
I created this with window-pens. I picked up the red one and wrote:
'The Chamber of secrets has been opened. Enemies of heir beware.'
Unfortunately, I haven't got an image of this too!😜Also, If you have wooden windows or painted and they get steamed up and damp inside at night, wipe the words off before you go to bed or else they run and stain your window. In my case, it stained white windows red. At least it matched the furniture!😂
House point counter

This would be a good idea if you were playing games in teams because every time you scored a point, you could add an extra sweet to your side! Or you can just use it for decoration, like I did!
To make the centre, I basically got two long strips of cardboard, each the length of the tube itself and cut a slit along one of them. Then I slid the other one into the slit and secured with tape. Once you've done this, you can cover each section in coloured paper or paint it.
Slide this into the pot and decide where the front is going to be. I stuck a sign here saying- "Hogwart's Housepoints" and then drew a crest for each house and stuck it to the tube, it being in front of it's own house point section! 👀
These decorations are simple yet effective. All you need to do is print the pictures off below, A4 size (apart from the 'Lumos' and 'Nox' signs which need to be the width of your light switch).
Here are the images:
----------------------------------------------------------------------------------


You can print them, then cut them out and put them in places around your party. For instance:
 |
| Around the light switch |
 |
| On the door |
 |
| Where she is not wanted! The toilet! |
Dementors and Ghosts👻
To be fair, my dementors and ghosts were rubbish because my tissue paper was too small. I bet you can make better ones if so, tell me what you did in the comments and how to make them!
Here is mine:
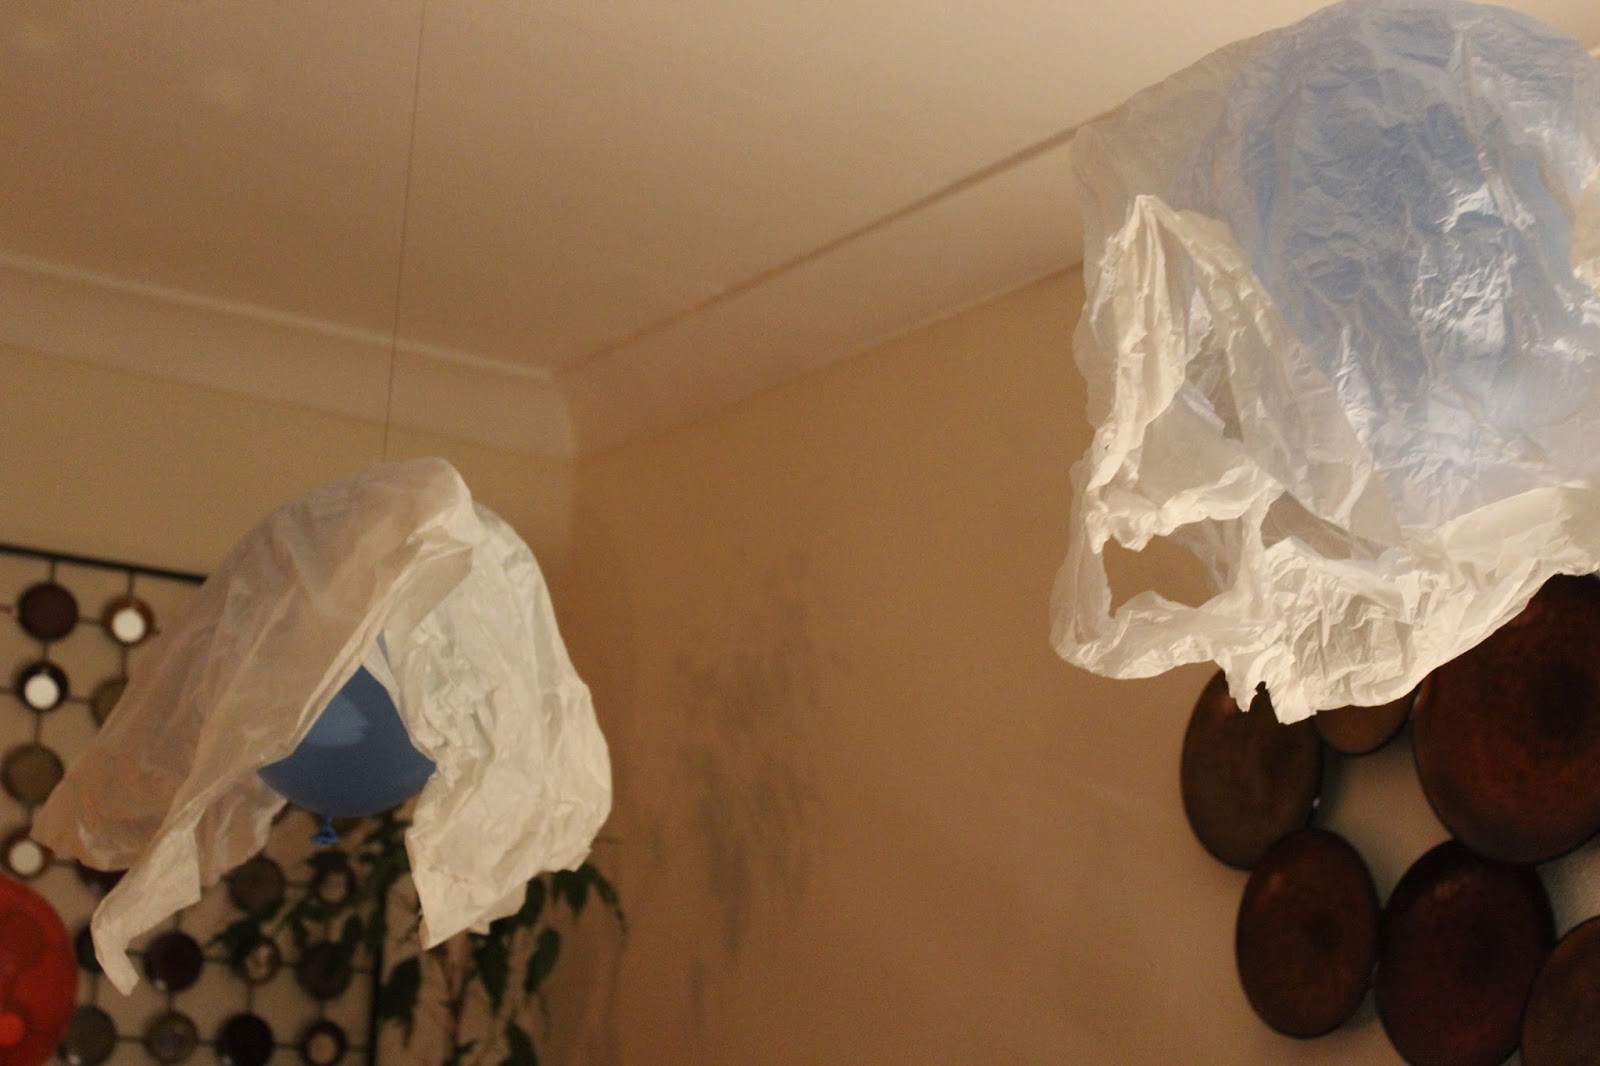
I got balloons and stuck some thread to them, then made a hole in the middle of the tissue paper and threaded it on. I then hung it from the ceiling by the thread. I made a black one too for a dementor but I haven't got a picture.
The Chamber Of Secrets Words
I created this with window-pens. I picked up the red one and wrote:
'The Chamber of secrets has been opened. Enemies of heir beware.'
Unfortunately, I haven't got an image of this too!😜Also, If you have wooden windows or painted and they get steamed up and damp inside at night, wipe the words off before you go to bed or else they run and stain your window. In my case, it stained white windows red. At least it matched the furniture!😂
House point counter

This would be a good idea if you were playing games in teams because every time you scored a point, you could add an extra sweet to your side! Or you can just use it for decoration, like I did!
To make the centre, I basically got two long strips of cardboard, each the length of the tube itself and cut a slit along one of them. Then I slid the other one into the slit and secured with tape. Once you've done this, you can cover each section in coloured paper or paint it.
Slide this into the pot and decide where the front is going to be. I stuck a sign here saying- "Hogwart's Housepoints" and then drew a crest for each house and stuck it to the tube, it being in front of it's own house point section! 👀
Potter's Potions
 |
| Gillyweed (LEFT), Fermented Blood Worms (RIGHT) |
 |
No Harry Potter Party would be the same without POTIONS!🍶-Weird emoji- It's meant to be a cup and jug!
I made several and have lasted until about two weeks later (the liquid ones).
Here is the list:
- Gillyweed
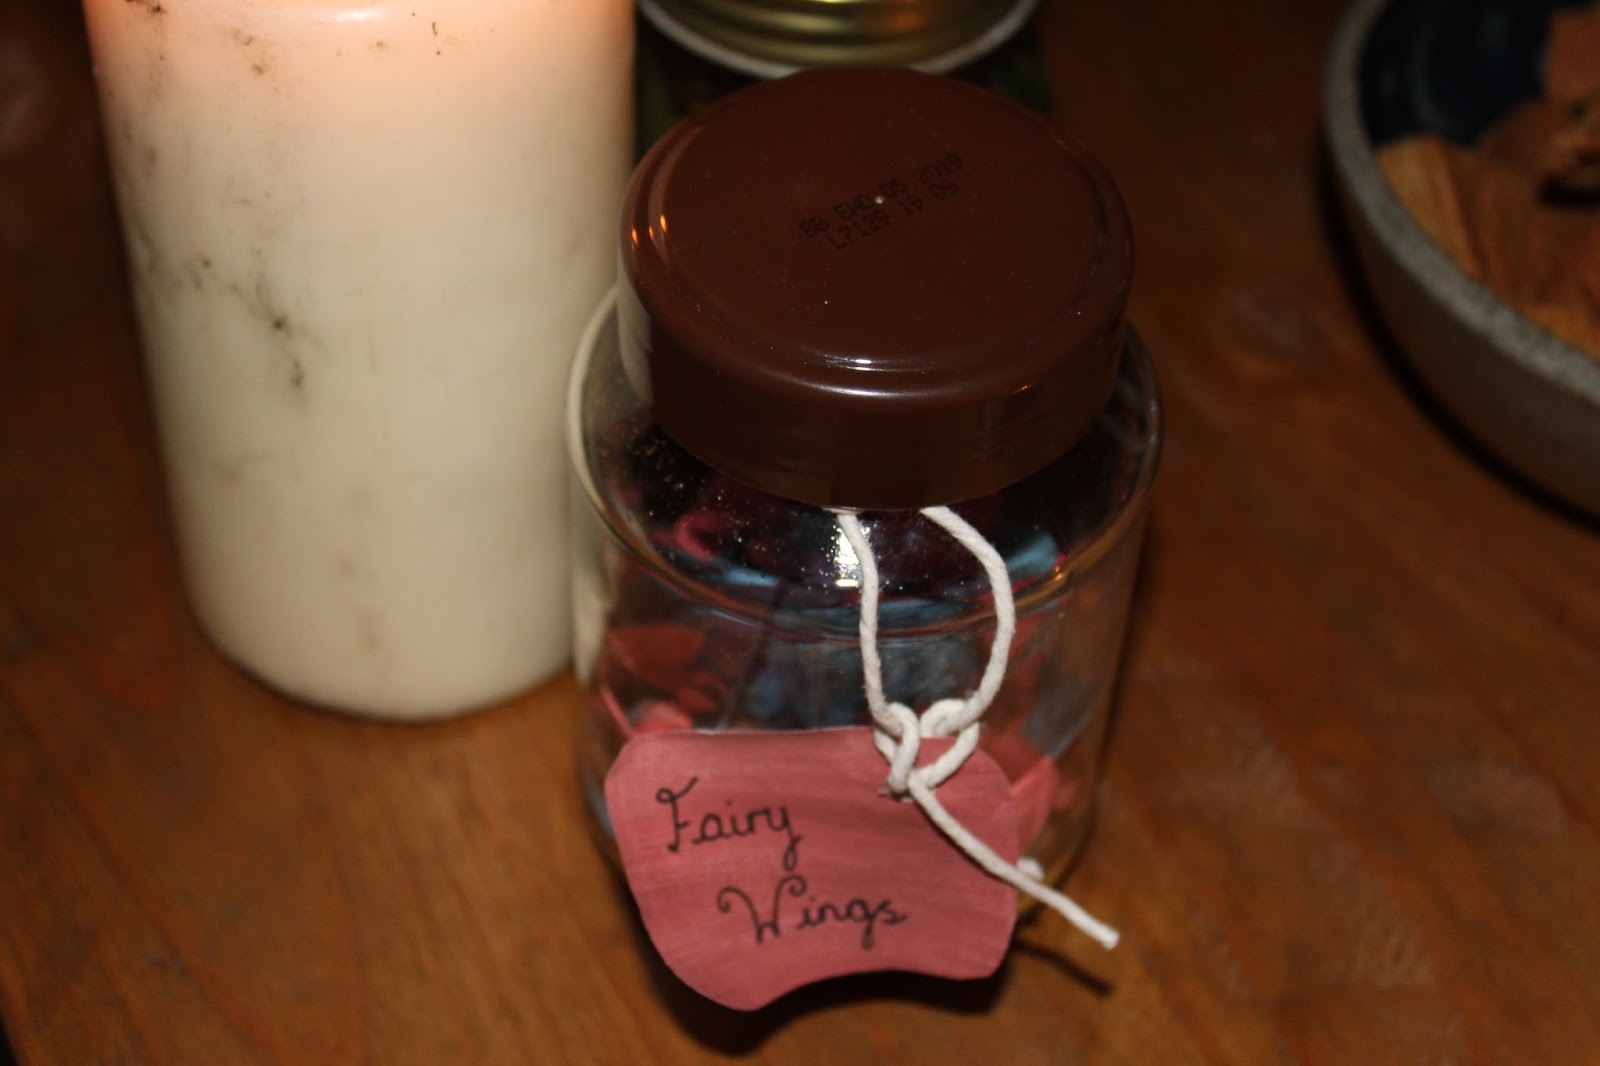
- Fairy Wings
- Fermented Bloodworms
Gillyweed-
Grab some weeds and grass from your garden and put them in a jar of water- simple!🏡
Fairy Wings-
I saw this idea on Pinterest and gave it my own twist. I got some helicopter seeds (sycamore seeds) and dipped them in different colour paints and left them to dry on a piece of paper.🌱
I then put them in a jar and sprinkled glitter in it. I also added a label.
Fermented Bloodworms-
Boil some spaghetti until soft🍝. Put it into the jar with some clean water and wait until cool. Add blue food colouring!
----------------------------------------------------------------------------------
I cannot fit anymore into this post so I'm making it Part One! See you in Part Two- coming soon! Sounds like a film advert!📽
Stay tuned for more!
Elly🏆


Comments
Post a Comment