Marching Into Spring.
'Marching Into Spring'- see what I did there?! 😁 It may not yet be officially spring but the weather seems to be brightening up; flowers are beginning to grow and the temperature seems to be slowly rising. As I have not written a post "Photography-based" in an AGE, I decided that the change of season would be a great excuse to!

I LOVE to take photos, however, I know that I am not an expert. There's always room to improve, though, right!? That's why I think this spring is going to be great fun for taking photos of new wildlife and ever-changing landscapes. My photography has been mostly limited to the indoors this winter as the weather has been freezing❄. So now it's getting warmer, I'm going to leap at the chance to spend more time outside, taking photos.

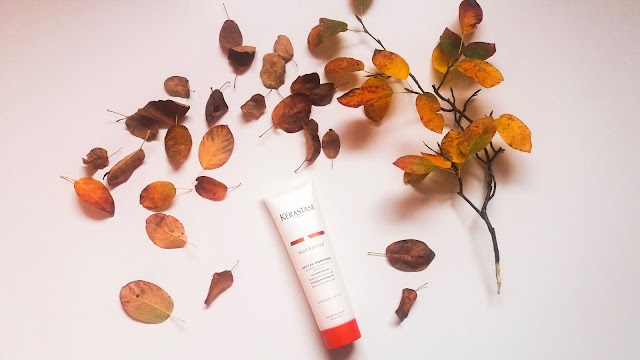
To kick-start my springtime photography, I decided that I would try my hand at something a little bit different to my usual photos. As you can see from the first photo in the post, I selected a few spring-related objects and some other bits and bobs that I thought would go well. My kitchen table went with the objects, too, so that's where I chose to take the photos. Next, I arranged the leaves and confetti so that they were well distributed across the surface, added the string and finally laid down the flowers into their position.

I was really pleased with this arrangement as it was a bit different to my normal photos yet it fitted so well with this post! I found that as it was positioned directly next to a window with tons of natural light, it was not necessary for the flash or else it ended up like this:


Also, as I experimented, I discovered that if you held a piece of coloured tissue paper, up, against the flash, the effect was really cool. The photo I was taking wasn't necessarily the best for the effect, for instance, a lit candle in a dark room with the orange tissue paper might work better than this arrangement. In addition, you could put the tissue paper over half the flash- it might give an interesting result. Maybe, put two or more colours across it. When I tried this with two colours (bearing in mind I didn't do it that accurately- there was a gap in the middle) it left a slight tinge of each colour on each side. Furthermore, when I covered half of it, there was no difference to a normal photograph with flash. Blue and pink had no effect.
RED

ORANGE

PURPLE

MIX OF RED/ORANGE

MIX OF PURPLE/PINK

MIX OF PINK/BLUE

Have you got any photography tips? Tell me in the comments! If you enjoyed this more chatty photography post, tell me if you want to see more posts like this and another way you can show this is to hit that 'Follow' button to join the family. Thank you, once again to those of you who already have!
Stay tuned for more,
Elly🙊🎕

I LOVE to take photos, however, I know that I am not an expert. There's always room to improve, though, right!? That's why I think this spring is going to be great fun for taking photos of new wildlife and ever-changing landscapes. My photography has been mostly limited to the indoors this winter as the weather has been freezing❄. So now it's getting warmer, I'm going to leap at the chance to spend more time outside, taking photos.

To kick-start my springtime photography, I decided that I would try my hand at something a little bit different to my usual photos. As you can see from the first photo in the post, I selected a few spring-related objects and some other bits and bobs that I thought would go well. My kitchen table went with the objects, too, so that's where I chose to take the photos. Next, I arranged the leaves and confetti so that they were well distributed across the surface, added the string and finally laid down the flowers into their position.

I was really pleased with this arrangement as it was a bit different to my normal photos yet it fitted so well with this post! I found that as it was positioned directly next to a window with tons of natural light, it was not necessary for the flash or else it ended up like this:


Also, as I experimented, I discovered that if you held a piece of coloured tissue paper, up, against the flash, the effect was really cool. The photo I was taking wasn't necessarily the best for the effect, for instance, a lit candle in a dark room with the orange tissue paper might work better than this arrangement. In addition, you could put the tissue paper over half the flash- it might give an interesting result. Maybe, put two or more colours across it. When I tried this with two colours (bearing in mind I didn't do it that accurately- there was a gap in the middle) it left a slight tinge of each colour on each side. Furthermore, when I covered half of it, there was no difference to a normal photograph with flash. Blue and pink had no effect.
RED

ORANGE

PURPLE

MIX OF RED/ORANGE

MIX OF PURPLE/PINK

MIX OF PINK/BLUE

Have you got any photography tips? Tell me in the comments! If you enjoyed this more chatty photography post, tell me if you want to see more posts like this and another way you can show this is to hit that 'Follow' button to join the family. Thank you, once again to those of you who already have!
Stay tuned for more,
Elly🙊🎕
My previous post: My Daily Make-up Routine-
https://ellycuriouswords.blogspot.co.uk/2018/03/my-daily-make-up-routine.html

I particularly like the muted colour effect from putting tissue in front of your lens - my favorite is purple!
ReplyDeleteGlad you like it!
DeleteThank you! If you wanted to, I'm sure you'd be able to take photos a million times better than I can!
Delete